6.Test Builder
6.1.General Information
The full-featured Test Builder implemented in Sindy makes it possible to create various types of tests. It is recommended to create tests in the following sequence:
- Create one or more test groups, which makes it considerably easier to work with a large number of tests by dividing them into specific logical groups. For example, create test groups such as “Psychological Tests”, “Educational Tests”, “Certification Tests”, or define your own grouping rules.
Create the required test objects, define their properties, and prepare them to be populated with the remaining test objects. A mandatory Sindy rule is that each test must belong to exactly one predefined test group.
- Create test scales to measure individual characteristics whose combination is identified by the test.
- Create interpretations for each scale to implement a mechanism for automatically generating conclusions based on test results.
- Define questions in the test that will be presented to the user during testing.
- Create answers for each question that the user can select when the questions are presented.
- Create weights for answers that determine how strongly a particular answer affects the final result on a predefined scale.
In addition, the Test Builder provides the following useful functions:
- Changing the order of objects
- Deleting a group of objects
- Importing a test
- Exporting a test
- Searching for objects
6.2.Creating, Editing, and Deleting a Test Group
A test group makes it easier to work with a large number of tests by dividing them into logically related subsets.
A test group can be created, edited, or deleted only in a created or open project.
6.2.1.Creating and Editing a Test Group
The create-test-group operation not only creates a new group in the current project but also allows its properties to be defined. To start the create-test-group operation, use one of the following methods:
- Select the “Tests” node in the Test Builder node tree and activate the main menu command “Object → Create test group”.
- Select the “Tests” node in the Test Builder node tree and use the keyboard shortcut SHIFT-Ins.
- Select the “Tests” node in the Test Builder node tree and activate the context menu command “Create test group”.
- Select the “Tests” node in the Test Builder node tree and click the toolbar button

.
The edit-test-group operation does not create a new group in the current project; it only allows the properties of an existing group to be changed. To start the edit-test-group operation, likewise use one of the following methods:
- Select the node of the group to be edited in the Test Builder node tree and activate the main menu command “Object → Edit test group”.
- Select the node of the group to be edited in the Test Builder node tree and use the keyboard shortcut SHIFT-Enter.
- Select the node of the group to be edited in the Test Builder node tree and activate the context menu command “Edit test group”.
- Select the node of the group to be edited in the Test Builder node tree and click the toolbar button

.
The following properties are defined for every test group: “Name” and “Description”. The name is a required field and cannot be empty. It cannot exceed 255 characters and must occupy only one line. Unlike the name, the description is practically unlimited in length. The description can also consist of any number of paragraphs.
The name is always displayed in the Test Builder tree as the test-group node. The description is used by the user only for reference purposes to store additional information about the test group.
When the create-test-group operation is started, the program automatically fills in the “Name” field. However, the value of this field can be changed at any time.
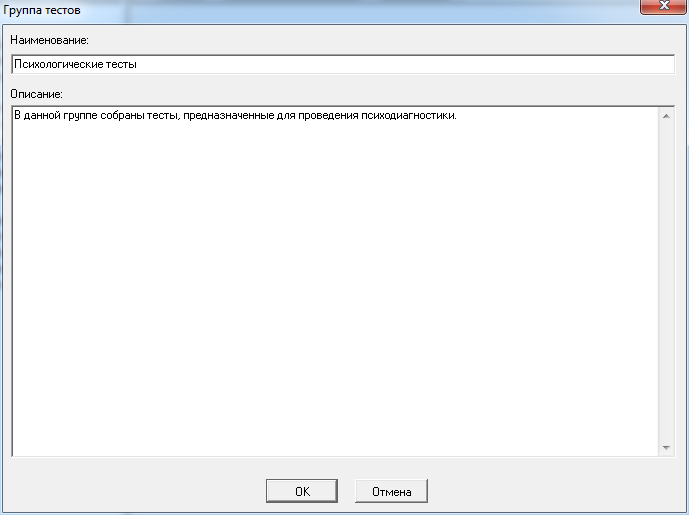
Specify the test-group properties in this window:
- In the “Name” field, enter a valid name for the test group that will be displayed in the Test Builder node tree.
- In the “Description” field, enter any useful information related to this test group.
To confirm the invoked operation, click OK. When creating a test group, a new test group is created; when editing, the new properties are saved for the selected test group.
To cancel the invoked operation, click “Cancel”. In both cases (creating and editing a test group), this closes the “Test Group” window and no test objects are created or modified.
6.2.2.Deleting a Test Group
The delete-test-group operation deletes the test group itself and recursively deletes all tests contained in that group together with all test objects belonging to those tests. To start the delete-test-group operation, use one of the following methods:
- Select the node of the group to be deleted in the Test Builder node tree and activate the main menu command “Object → Delete test group”.
- Select the node of the group to be deleted in the Test Builder node tree and use the keyboard shortcut SHIFT-Del.
- Select the node of the group to be deleted in the Test Builder node tree and activate the context menu command “Delete test group”.
- Select the node of the group to be deleted in the Test Builder node tree and click the toolbar button

.
To permanently delete the selected test group from the project, additional confirmation is required when prompted by Sindy.
6.3.Creating, Editing, and Deleting a Test
A test is the principal testing object that combines sets of logically related elements. A test defines its structure, testing rules, and result-evaluation criteria.
A test can be created, edited, or deleted only in a created or open project.
6.3.1.Creating and Editing a Test
The create-test operation not only creates a new test in the current project but also allows its properties to be defined. To start the create-test operation, use one of the following methods:
- Select the test-group node in which the new test is being created in the Test Builder node tree and activate the main menu command “Object → Create test”.
- Select the test-group node in which the new test is being created in the Test Builder node tree and use the keyboard shortcut SHIFT-Ins.
- Select the test-group node in which the new test is being created in the Test Builder node tree and activate the context menu command “Create test”.
- Select the test-group node in which the new test is being created in the Test Builder node tree and click the toolbar button
.
The edit-test operation does not create a new test in the current project; it only allows the properties of an existing test to be changed. To start the edit-test operation, likewise use one of the following methods:
- Select the node of the test to be edited in the Test Builder node tree and activate the main menu command “Object → Edit test”.
- Select the node of the test to be edited in the Test Builder node tree and use the keyboard shortcut SHIFT-Enter.
- Select the node of the test to be edited in the Test Builder node tree and activate the context menu command “Edit test”.
- Select the node of the test to be edited in the Test Builder node tree and click the toolbar button
.
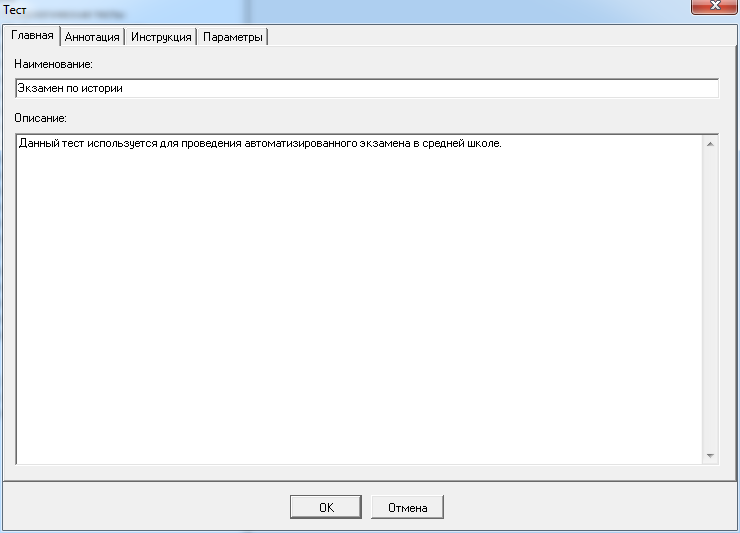
The window for creating or editing a test contains a set of tabs on which special interface elements can be used to change test properties. In particular, the following tabs are defined: “Main”, “Annotation”, “Instructions”, and “Parameters”.
The following important properties are defined for every test: “Name” and “Description”. The name is a required field and cannot be empty. It cannot exceed 255 characters and must occupy only one line. Unlike the name, the description is practically unlimited in length. The description can also consist of any number of paragraphs.
The name is always displayed in the Test Builder tree as the test node. The description is used by the user only for reference purposes to store additional information about the test.
When the create-test operation is started, the program automatically fills in the “Name” field. However, the value of this field can be changed at any time.
On the “Main” tab, the following test properties can be changed:
- In the “Name” field, enter a valid name for the test that will be displayed in the Test Builder node tree.
- In the “Description” field, enter any useful information related to this test.
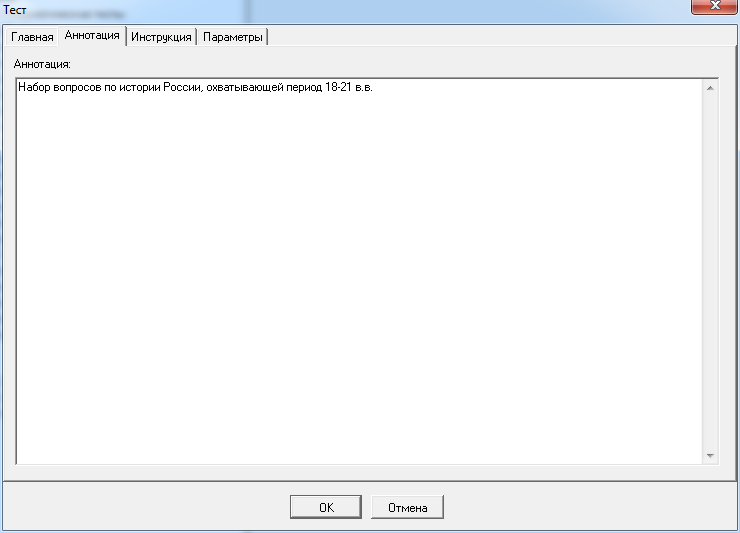
On the “Annotation” tab, enter specific information related to this test in the “Annotation” field. The test annotation is used by the user only for reference purposes.
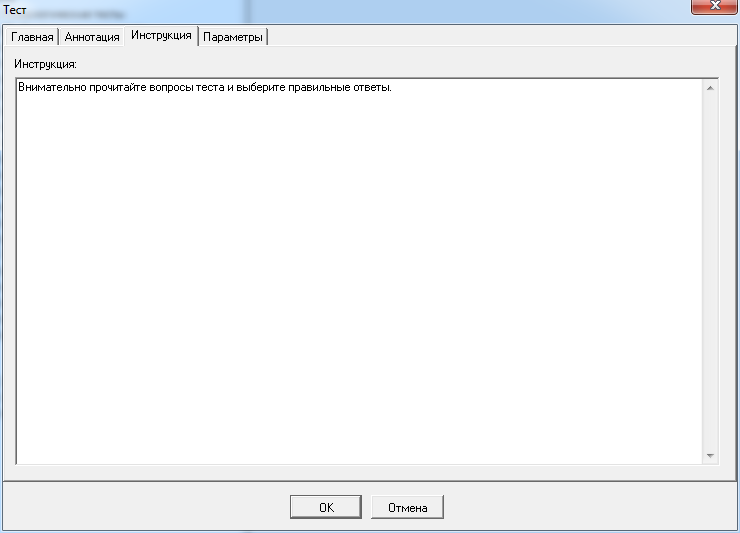
On the “Instructions” tab, enter in the “Instructions” field the information that will be displayed to the test taker in the first window of the running test.
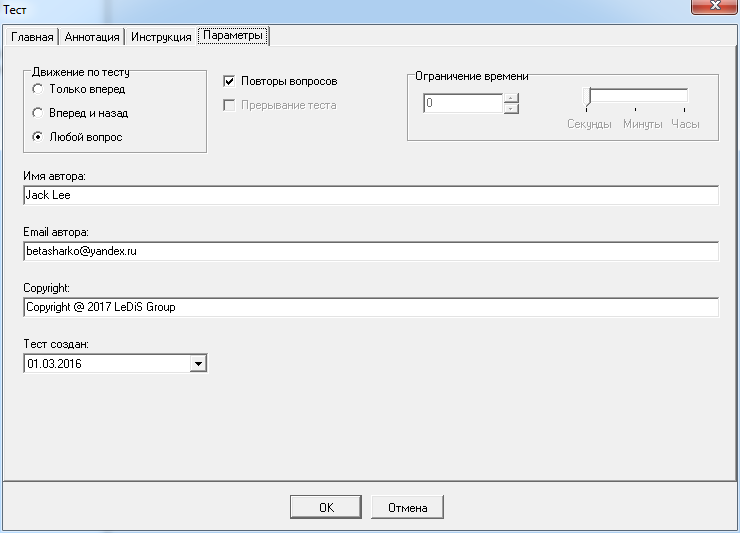
On the “Parameters” tab, the following test properties can be changed:
- For the “Test navigation” property group, activate one of the following options using the left mouse button or the arrow keys on the keyboard (use the Tab key to move to the active radio button in this group):
- The “Forward only” radio button if questions should be displayed sequentially from the first question to the last during testing according to their defined order.
- The “Forward and backward” radio button if questions should be displayed sequentially in both directions, forward and backward, during testing according to their defined order.
- The “Any question” radio button if the user should be able to move to any test question of their choice during testing.
- Activate the “Question repeats” checkbox using the left mouse button or the Space key (use the Tab key to move to this control) if, when the “Any question” radio button is active, it should be possible to return to questions that have already been completed. The “Question repeats” checkbox is available only when “Any question” test navigation is selected.
- Activate the “Test interruption” checkbox using the left mouse button or the Space key (use the Tab key to move to this control) if this test may be interrupted and resumed later at any time.
- Enter your name in the “Author name” field so that your name is displayed when this test is launched on the ledisgroup.com website.
- Enter your email in the “Author name” field; the test results will be sent to this address after a client completes this test on the ledisgroup.com website.
- Enter copyright information in the “Copyright” field to record your rights to this test.
- Specify the test development date in the “Test created” field.
To confirm the changes made to the test, click OK. When creating a test, a new test is created; when editing, the new properties are saved for the selected test.
To cancel the changes made to the test, click “Cancel”. In both cases (creating and editing a test), this only closes the “Test” window and no test objects are created or modified.
A test cannot be edited if it was imported into the project from a file to which it had previously been exported as private.
6.3.2.Deleting a Test
The delete-test operation deletes the test itself and recursively deletes all test objects contained in that test (scales, interpretations, questions, answers, and weights). To start the delete-test operation, use one of the following methods:
- Select the node of the test to be deleted in the Test Builder node tree and activate the main menu command “Object → Delete test”.
- Select the node of the test to be deleted in the Test Builder node tree and use the keyboard shortcut SHIFT-Del.
- Select the node of the test to be deleted in the Test Builder node tree and activate the context menu command “Delete test”.
- Select the node of the test to be deleted in the Test Builder node tree and click the toolbar button
.
To permanently delete the selected test from the project, additional confirmation is required when prompted by Sindy.
6.4.Creating, Editing, and Deleting a Scale
A scale reflects specific test characteristics whose combination is identified during testing.
A scale can be created, edited, or deleted only in a created or open project.
6.4.1.Creating and Editing a Scale
The create-scale operation not only creates a new scale in the current project but also allows its properties to be defined. To start the create-scale operation, use one of the following methods:
- Select the “Scales and Interpretations” node of a particular test in the Test Builder node tree and activate the main menu command “Object → Create scale”.
- Select the “Scales and Interpretations” node of a particular test in the Test Builder node tree and use the keyboard shortcut SHIFT-Ins.
- Select the “Scales and Interpretations” node of a particular test in the Test Builder node tree and activate the context menu command “Create scale”.
- Select the “Scales and Interpretations” node of a particular test in the Test Builder node tree and click the toolbar button
.
The edit-scale operation does not create a new scale in the current project; it only allows the properties of an existing scale to be changed. To start the edit-scale operation, likewise use one of the following methods:
- Select the node of the scale to be edited in the Test Builder node tree and activate the main menu command “Object -> Edit scale”.
- Select the node of the scale to be edited in the Test Builder node tree and use the keyboard shortcut SHIFT-Enter.
- Select the node of the scale to be edited in the Test Builder node tree and activate the context menu command “Edit scale”.
- Select the node of the scale to be edited in the Test Builder node tree and click the toolbar button
.
The following properties are defined for every scale: “Name” and “Description”. The name is a required field and cannot be empty. It cannot exceed 255 characters and must occupy only one line. Unlike the name, the description is practically unlimited in length. The description can also consist of any number of paragraphs.
The name is always displayed in the Test Builder tree as the scale node. The description is displayed in the test results if information has been entered in the corresponding field. Thus, extended information can be used to identify the scale. Otherwise, the scale name is used in the test results.
When the create-scale operation is started, the program automatically fills in the “Name” field. However, the value of this field can be changed at any time.
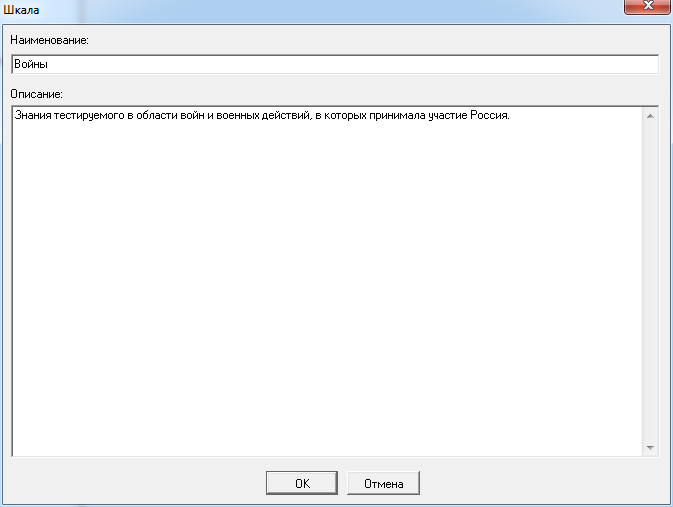
Specify the scale properties in this window:
- In the “Name” field, enter a valid scale name that will be displayed in the Test Builder node tree.
- In the “Description” field, enter any useful information related to this scale.
To confirm the invoked operation, click OK. When creating a scale, a new scale is created; when editing, the new properties are saved for the selected scale.
To cancel the invoked operation, click “Cancel”. In both cases (creating and editing a scale), this only closes the “Scale” window and no test objects are created or modified.
A scale cannot be edited in a test imported into the project from a file to which the test had previously been exported as private.
6.4.2.Deleting a Scale
The delete-scale operation deletes the scale itself and recursively deletes all interpretations contained in that scale. To start the delete-scale operation, use one of the following methods:
- Select the node of the scale to be deleted in the Test Builder node tree and activate the main menu command “Object → Delete scale”.
- Select the node of the scale to be deleted in the Test Builder node tree and use the keyboard shortcut SHIFT-Del.
- Select the node of the scale to be deleted in the Test Builder node tree and activate the context menu command “Delete scale”.
- Select the node of the scale to be deleted in the Test Builder node tree and click the toolbar button
.
Deleting a scale referenced by existing weights in the test changes the icons of those weights in the Test Builder node tree from the standard appearance 
to  . This means that the weight is dangling and is not used because no scale is defined for it. In this case, it is recommended to either define a new scale for this weight or delete the unnecessary weight.
To permanently delete the selected scale from the project, additional confirmation is required when prompted by Sindy.
6.5.Creating, Editing, and Deleting an Interpretation
Interpretations are used for automated evaluation of test results. They are displayed as statements of test results when a result falls within a particular predefined part of a scale’s numeric range.
An interpretation can be created, edited, or deleted only in a created or open project.
6.5.1.Creating and Editing an Interpretation
The create-interpretation operation not only creates a new interpretation in the current project but also allows its properties to be defined. To start the create-interpretation operation, use one of the following methods:
- Select the node of a particular scale in the Test Builder node tree and activate the main menu command “Object → Create interpretation”.
- Select the node of a particular scale in the Test Builder node tree and use the keyboard shortcut SHIFT-Ins.
- Select the node of a particular scale in the Test Builder node tree and activate the context menu command “Create interpretation”.
- Select the node of a particular scale in the Test Builder node tree and click the toolbar button
.
The edit-interpretation operation does not create a new interpretation in the current project; it only allows the properties of an existing interpretation to be changed. To start the edit-interpretation operation, likewise use one of the following methods:
- Select the node of the interpretation to be edited in the Test Builder node tree and activate the main menu command “Object → Edit interpretation”.
- Select the node of the interpretation to be edited in the Test Builder node tree and use the keyboard shortcut SHIFT-Enter.
- Select the node of the interpretation to be edited in the Test Builder node tree and activate the context menu command “Edit interpretation”.
- Select the node of the interpretation to be edited in the Test Builder node tree and click the toolbar button
.
The following properties are defined for every interpretation: “Name” and “Description”. The name is a required field and cannot be empty. It cannot exceed 255 characters and must occupy only one line. Unlike the name, the description is practically unlimited in length. The description can also consist of any number of paragraphs.
The name is always displayed in the Test Builder tree as the interpretation node. The description is displayed in the test results if information has been entered in the corresponding field. Thus, extended information can be used to identify the interpretation. Otherwise, the interpretation name is used in the test results.
When the create-interpretation operation is started, the program automatically fills in the “Name” field. However, the value of this field can be changed at any time.
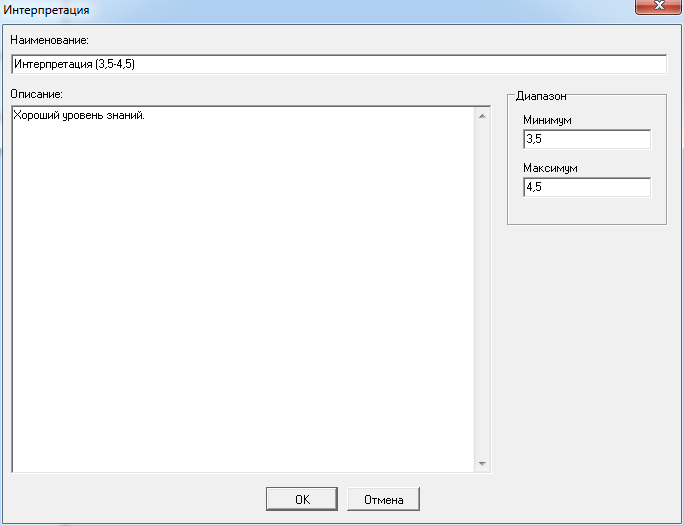
Specify the interpretation properties in this window:
- In the “Name” field, enter a valid interpretation name that will be displayed in the Test Builder node tree
- In the “Description” field, enter any useful information related to this interpretation.
To confirm the invoked operation, click OK. When creating an interpretation, a new interpretation is created; when editing, the new properties are saved for the selected interpretation.
To cancel the invoked operation, click “Cancel”. In both cases (creating and editing an interpretation), this only closes the “Interpretation” window and no test objects are created or modified.
An interpretation cannot be edited in a test imported into the project from a file to which the test had previously been exported as private.
6.5.2.Deleting an Interpretation
To start the delete-interpretation operation, use one of the following methods:
- Select the node of the interpretation to be deleted in the Test Builder node tree and activate the main menu command “Object → Delete interpretation”.
- Select the node of the interpretation to be deleted in the Test Builder node tree and use the keyboard shortcut SHIFT-Del.
- Select the node of the interpretation to be deleted in the Test Builder node tree and activate the context menu command “Delete interpretation”.
- Select the node of the interpretation to be deleted in the Test Builder node tree and click the toolbar button
.
To permanently delete the selected interpretation from the project, additional confirmation is required when prompted by Sindy.
6.6.Creating, Editing, and Deleting a Question
A question is a test object used to obtain a response from the test-taking respondent. During testing, each question is displayed in a separate window.
A question can be created, edited, or deleted only in a created or open project.
6.6.1.Creating and Editing a Question
The create-question operation not only creates a new question in the current project but also allows its properties to be defined. To start the create-question operation, use one of the following methods:
- Select the “Questions and Answers” node of a particular test in the Test Builder node tree and activate the main menu command “Object → Create test group”.
- Select the “Questions and Answers” node of a particular test in the Test Builder node tree and use the keyboard shortcut SHIFT-Ins.
- Select the “Questions and Answers” node of a particular test in the Test Builder node tree and activate the context menu command “Create test group”.
- Select the “Questions and Answers” node of a particular test in the Test Builder node tree and click the toolbar button
.
The edit-question operation does not create a new question in the current project; it only allows the properties of an existing question to be changed. To start the edit-question operation, likewise use one of the following methods:
- Select the node of the question to be edited in the Test Builder node tree and activate the main menu command “Object → Edit question”.
- Select the node of the question to be edited in the Test Builder node tree and use the keyboard shortcut SHIFT-Enter.
- Select the node of the question to be edited in the Test Builder node tree and activate the context menu command “Edit question”.
- Select the node of the question to be edited in the Test Builder node tree and click the toolbar button
.
The following properties are defined for every question: “Name” and “Description”. The name is a required field and cannot be empty. It cannot exceed 255 characters and must occupy only one line. Unlike the name, the description is practically unlimited in length. The description can also consist of any number of paragraphs.
The name is always displayed in the Test Builder tree as the question node. The description is displayed as the question during testing and in the test results if information has been entered in the corresponding field. Thus, extended information can be used to identify the question. Otherwise, the question name is used during testing and in its results.
When the create-question operation is started, the program automatically fills in the “Name” field. However, the value of this field can be changed at any time.
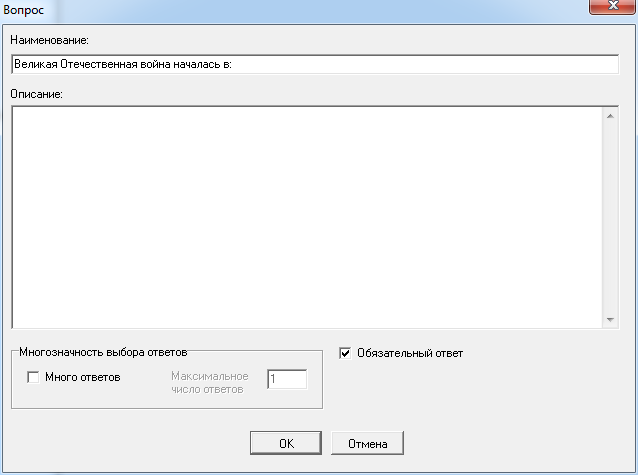
Specify the question properties in this window:
- In the “Name” field, enter a valid question name that will be displayed in the Test Builder node tree and used during testing if the “Description” field is empty.
- In the “Description” field, enter any useful information related to this question.
- For the “Multiple answer selection” property group, if required (use the Tab key to move between the elements of the group):
- Activate the “Multiple answers” checkbox if the user may select more than one answer to this question during testing
- In the “Maximum number of answers” field, specify the maximum number of answers that the user may select for this question during testing (this field is available when “Multiple answers” is active)
- Activate the “Required answer” checkbox if the user must select at least one answer to this question during testing
To confirm the invoked operation, click OK. When creating a question, a new question is created; when editing, the new properties are saved for the selected question.
To cancel the invoked operation, click “Cancel”. In both cases (creating and editing a question), this only closes the “Question” window and no test objects are created or modified.
A question cannot be edited in a test imported into the project from a file to which the test had previously been exported as private.
6.6.2.Deleting a Question
The delete-question operation deletes the question itself and recursively deletes all answers contained in this group together with all weights belonging to those answers. To start the delete-question operation, use one of the following methods:
- Select the node of the question to be deleted in the Test Builder node tree and activate the main menu command “Object → Delete question”.
- Select the node of the question to be deleted in the Test Builder node tree and use the keyboard shortcut SHIFT-Del.
- Select the node of the question to be deleted in the Test Builder node tree and activate the context menu command “Delete question”.
- Select the node of the question to be deleted in the Test Builder node tree and click the toolbar button
.
To permanently delete the selected question from the project, additional confirmation is required when prompted by Sindy.
6.7.Creating, Editing, and Deleting an Answer
An answer defines the response that a test-taking respondent can select from the list offered for the current question presented during testing.
An answer can be created, edited, or deleted only in a created or open project.
6.7.1.Creating and Editing an Answer
The create-answer operation not only creates a new answer in the current project but also allows its properties to be defined. To start the create-answer operation, use one of the following methods:
- Select the node of a particular question in the Test Builder node tree and activate the main menu command “Object → Create answer”.
- Select the node of a particular question in the Test Builder node tree and use the keyboard shortcut SHIFT-Ins.
- Select the node of a particular question in the Test Builder node tree and activate the context menu command “Create answer”.
- Select the node of a particular question in the Test Builder node tree and click the toolbar button
.
The edit-answer operation does not create a new answer in the current project; it only allows the properties of an existing answer to be changed. To start the edit-answer operation, likewise use one of the following methods:
- Select the node of the answer to be edited in the Test Builder node tree and activate the main menu command “Object → Edit answer”.
- Select the node of the answer to be edited in the Test Builder node tree and use the keyboard shortcut SHIFT-Enter.
- Select the node of the answer to be edited in the Test Builder node tree and activate the context menu command “Edit answer”.
- Select the node of the answer to be edited in the Test Builder node tree and click the toolbar button
.
The following properties are defined for every answer: “Name” and “Description”. The name is a required field and cannot be empty. It cannot exceed 255 characters and must occupy only one line. Unlike the name, the description is practically unlimited in length. The description can also consist of any number of paragraphs.
The name is always displayed in the Test Builder tree as the answer node. The description is displayed as the answer during testing and in the test results if information has been entered in the corresponding field. Thus, extended information can be used to identify the answer. Otherwise, the answer name is used during testing and in its results.
When the create-answer operation is started, the program automatically fills in the “Name” field. However, the value of this field can be changed at any time.
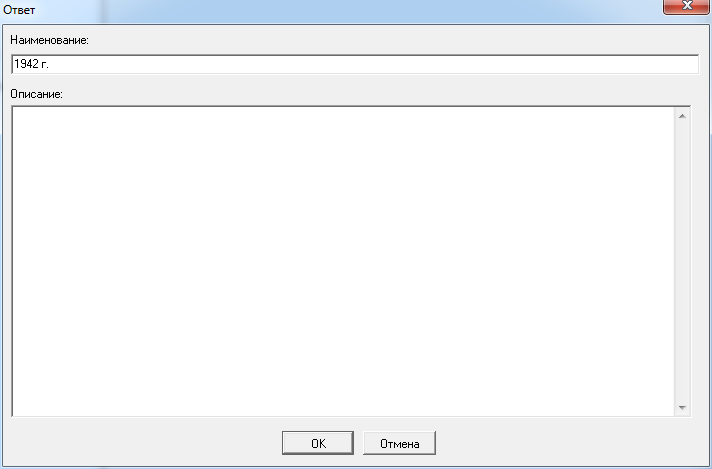
Specify the answer properties in this window:
- In the “Name” field, enter a valid answer name that will be displayed in the Test Builder node tree and used during testing if the “Description” field is empty.
- In the “Description” field, enter any useful information related to this answer.
To confirm the invoked operation, click OK. When creating an answer, a new answer is created; when editing, the new properties are saved for the selected answer.
To cancel the invoked operation, click “Cancel”. In both cases (creating and editing an answer), this only closes the “Answer” window and no test objects are created or modified.
An answer cannot be edited in a test imported into the project from a file to which the test had previously been exported as private.
6.7.2.Deleting an Answer
The delete-answer operation deletes the answer itself and recursively deletes all weights associated with it. To start the delete-answer operation, use one of the following methods:
- Select the node of the answer to be deleted in the Test Builder node tree and activate the main menu command “Object → Delete answer”.
- Select the node of the answer to be deleted in the Test Builder node tree and use the keyboard shortcut SHIFT-Del.
- Select the node of the answer to be deleted in the Test Builder node tree and activate the context menu command “Delete answer”.
- Select the node of the answer to be deleted in the Test Builder node tree and click the toolbar button
.
To permanently delete the selected answer from the project, additional confirmation is required when prompted by Sindy.
6.8.Creating, Editing, and Deleting a Weight
A weight is a numeric characteristic that determines the effect of a particular answer on a selected scale when the test taker chooses that answer during testing.
A weight can be created, edited, or deleted only in a created or open project.
6.8.1.Creating and Editing a Weight
The create-weight operation not only creates a new weight in the current project but also allows its properties to be defined. To start the create-weight operation, use one of the following methods:
- Select the node of a particular answer in the Test Builder node tree and activate the main menu command “Object → Create weight”.
- Select the node of a particular answer in the Test Builder node tree and use the keyboard shortcut SHIFT-Ins.
- Select the node of a particular answer in the Test Builder node tree and activate the context menu command “Create weight”.
- Select the node of a particular answer in the Test Builder node tree and click the toolbar button
.
The edit-weight operation does not create a new weight in the current project; it only allows the properties of an existing weight to be changed. To start the edit-weight operation, likewise use one of the following methods:
- Select the node of the weight to be edited in the Test Builder node tree and activate the main menu command “Object → Edit weight”.
- Select the node of the weight to be edited in the Test Builder node tree and use the keyboard shortcut SHIFT-Enter.
- Select the node of the weight to be edited in the Test Builder node tree and activate the context menu command “Edit weight”.
- Select the node of the weight to be edited in the Test Builder node tree and click the toolbar button
.
The following properties are defined for every weight: “Name” and “Description”. The name is a required field and cannot be empty. It cannot exceed 255 characters and must occupy only one line. Unlike the name, the description is practically unlimited in length. The description can also consist of any number of paragraphs.
The name is always displayed in the Test Builder tree as the weight node. The description is used by the user only for reference purposes to store additional information about the weight.
When the create-question operation is started, the program automatically fills in the “Name” field. However, the value of this field can be changed at any time.
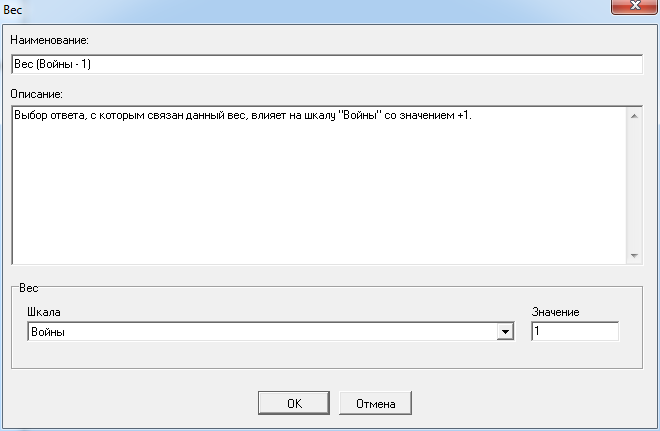
Specify the weight properties in this window:
- In the “Name” field, enter a valid weight name that will be displayed in the Test Builder node tree.
- In the “Description” field, enter any useful information related to this weight.
- For the “Weight” property group (use the Tab key to move between the elements of the group):
- Select the name of the associated scale from the “Scale” drop-down list if there are still unused scales for this answer.
- In the “Value” field, specify the numeric value by which this answer affects the result on the specified scale during testing.
To confirm the invoked operation, click OK. When creating a weight, a new weight is created; when editing, the new properties are saved for the selected weight.
To cancel the invoked operation, click “Cancel”. In both cases (creating and editing a weight), this only closes the “Weight” window and no test objects are created or modified.
A weight cannot be edited in a test imported into the project from a file to which the test had previously been exported as private.
6.8.2.Deleting a Weight
To start the delete-weight operation, use one of the following methods:
- Select the node of the weight to be deleted in the Test Builder node tree and activate the main menu command “Object → Delete weight”.
- Select the node of the weight to be deleted in the Test Builder node tree and use the keyboard shortcut SHIFT-Del.
- Select the node of the weight to be deleted in the Test Builder node tree and activate the context menu command “Delete weight”.
- Select the node of the weight to be deleted in the Test Builder node tree and click the toolbar button
.
To permanently delete the selected weight from the project, additional confirmation is required when prompted by Sindy.
6.9.Changing the Order of Objects
The order of test objects can be changed by the user directly in the node tree. For test groups, tests, scales, interpretations, and weights, this may be relevant only for how clearly they are presented in the Test Builder, whereas changing the order of questions and answers changes the sequence in which they are displayed during testing.
The order of objects can be changed only in a created or open project.
There are two ways to change the order of objects: using the Drag & Drop method and using the special “Arrange Objects” window. The first option is recommended when you need to change the order of individual test objects as quickly and conveniently as possible; the second is recommended when moving more than one object at a time.
To change the order of objects using the “Arrange Objects” window, first select a node in the node tree. In particular, to change the order of:
- test groups, select the “Tests” node;
- tests in a particular group, select that test-group node;
- scales of a particular test, select the “Scales and Interpretations” node of that test;
- interpretations of a particular scale, select that scale node;
- questions of a particular test, select the “Questions and Answers” node of that test
- answers to a particular question, select that question node;
- weights of a particular answer, select that answer node.
Then use one of the following methods:
- Activate the main menu command “Object → Arrange <test objects>…”, where <test objects> is replaced by the type of objects being arranged.
- Activate the context menu command “Arrange <test objects>…”, where <test objects> is replaced by the type of objects being arranged.
- Select the object in the Test Builder node tree whose child objects need to be arranged and click the toolbar button

.
Starting the arrangement operation opens the “Arrange Objects” window, which makes it possible to directly change the order of test objects. This window is particularly useful when a large number of objects need to be reordered.
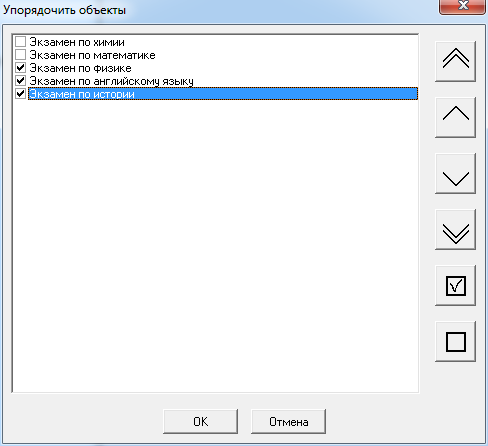
This window contains a list of objects that can be moved relative to one another. To indicate the particular objects that should be moved at the current time, select them by clicking the left mouse button while the pointer is over the square in front of the object name. Selected objects are marked with a check mark.
The buttons on the right move the objects selected in the list. These buttons include:
| Button icon | Button name | Description |
 |
Move All Selected Objects to Beginning | Move all selected objects to the beginning of the list while preserving their current order relative to one another. |
 |
Move All Selected Objects One Position Up | Move each selected object one position up while preserving the current order of the selected objects relative to one another. |
 |
Move All Selected Objects One Position Down | Move each selected object one position down while preserving the current order of the selected objects relative to one another. |
 |
Move All Selected Objects to End | Move all selected objects to the end of the list while preserving their current order relative to one another. |
 |
Select All Objects | Select all objects displayed in the arrangement window at once. |
 |
Deselect All Object | Deselect all objects displayed in the arrangement window at once. |
Instead of the buttons shown above, the corresponding commands in this window’s context menu can be used.
To save the changes made to the order of objects in the project, click OK; to return to the previous order and cancel all changes made in this window, click “Cancel”.
6.10.Deleting a Group of Objects
Sindy makes it possible to delete an entire group of test objects. Group deletion of test objects must be performed with extreme caution because this procedure cannot be undone after the operation is confirmed. It is strongly recommended to create a copy of the project file beforehand in case the deleted data should not in fact have been lost.
A group of objects can be deleted only in a created or open project.
To start the delete-group-of-objects operation, first select the parent node of these objects in the node tree. To delete:
- all test groups, select the “Tests” node;
- all tests in a particular group, select that test-group node;
- all scales of a particular test, select the “Scales and Interpretations” node of that test;
- all interpretations of a particular scale, select that scale node;
- all questions of a particular test, select the “Questions and Answers” node of that test;
- all answers to a particular question, select that question node;
- all weights of a particular answer, select that answer node.
Then use one of the following methods:
- Activate the main menu command “Object → Delete all <test objects>…”, where <test objects> is replaced by the type of objects being deleted.
- Activate the context menu command “Delete all <test objects>…”, where <test objects> is replaced by the type of objects being deleted.
- Select the node of the weight to be deleted in the Test Builder node tree and click the toolbar button

.
Starting the operation for deleting a group of test objects opens the “Confirm deleting child objects” confirmation dialog, which can be used either to confirm that the operation should be performed or to cancel it.
6.11.Searching for Objects
The node tree can contain a large number of test objects. To quickly find the required objects in the node tree, Sindy provides object-search functionality.
Objects can be searched for only in a created or open project.
To search for objects, first define the search criterion, i.e. specify in the program exactly what needs to be found. One of the nodes in the Test Builder tree must then be selected to define the starting point for the search. Next, start the object-search procedure using one of the following methods:
- Use the main menu command “Edit → Find…”.
- Use the keyboard shortcut “CTRL-F”.
- Use the toolbar button

.
Starting the search opens the “Find First” window. This window is used to define new search criteria in an open or created project and find the required objects using those criteria.
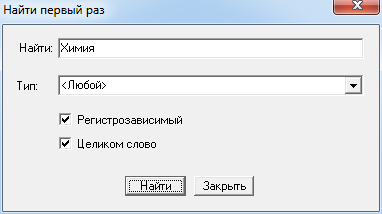
The search is performed across all nodes in the Test Builder tree, even if they do not correspond to particular test objects. As stated earlier, the search starts from the selected node and proceeds downward (toward the very last object in the node tree). Both hidden and expanded nodes are searched.
In the “Find” field, you can specify a word or only part of a word that must occur in the search result. The “Type” drop-down list can be used to search only objects of a predefined type (test groups, tests, scales, interpretations, questions, answers, or weights). If the “Case-sensitive” option is enabled, the search takes into account the case of the characters entered in the “Find” field. If the “Whole word” option is enabled, the search continues until a node containing the complete word specified in the “Find” field is found.
To start searching with the specified criteria, click “Find”; to cancel the search, click “Close”.
To change the search criteria, perform the procedure described above. You can also reuse the search criterion set previously. To do so, again select the starting node in the Test Builder node tree and then search using one of the following methods:
- Use the main menu command “Edit → Find Next”.
- Use the keyboard shortcut F3.
- Use the toolbar button

.
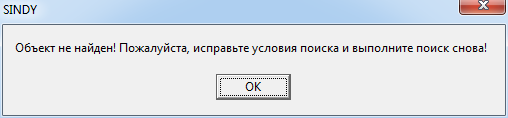
In both cases, the search result is a selected node in the node tree. If no nodes matching the specified criterion are found, the following message is displayed.
6.12.Importing and Exporting Data
6.12.1.Importing a Test
Test import makes it possible to add new tests to the current project. For example, some tests may have been developed by commercial companies, others may be original methods obtained from their authors, and still others may have been created independently using Sindy.
Tests can be imported only into a created or open project.
The test-import procedure can be started using one of the following methods:

Starting the procedure opens the “Import Test” window.
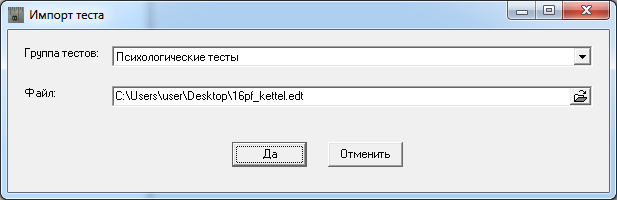
In this window:
- select the test group into which the test should be imported using the “Test group” list;
- enter the name of the file containing the test to be imported in the “File” field.
Click “Yes” to confirm importing data from the selected file or “Cancel” to cancel the operation and close the current dialog.
For convenient file selection, use the additional “Import Test” dialog by clicking the button 
.
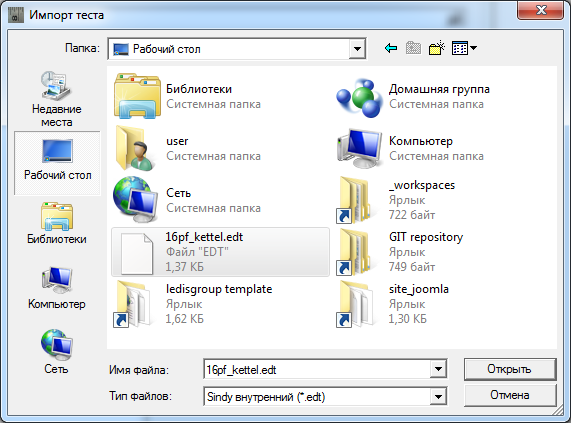
This window makes it possible to select a file containing a test in EDT format in order to import these tests into the user’s project.
To select the test-import file, specify its name in the “File name” field. You can enter the full path to the file or use the “Folder” drop-down list and the “Recent Places”, “Desktop”, “Libraries”, “Computer”, or “Network” buttons to locate the file. The “Files of type” drop-down list can be used to enable or disable file filtering by the standard file extension for Sindy projects.
Click “Open” to confirm selection of the file or “Cancel” to cancel the operation and close the current dialog.
The imported test is added to the selected test group.
Importing large tests into a project that already contains many tests can take quite a long time. In this case, be patient and wait for the procedure to finish.
Remember that if you import a test that was marked as private when it was exported, you will not be able to edit it or export it again. In this case, you can only take the test.
6.12.2.Exporting a Test
The test-export procedure makes it possible to save all information about a test to a file that can be transferred to another project, provided to another specialist for further work, or used to launch testing on the Internet.
A test can be exported only from a created or open project.
The test-import procedure can be started using one of the following methods:

Starting the procedure opens the “Export Test” window.
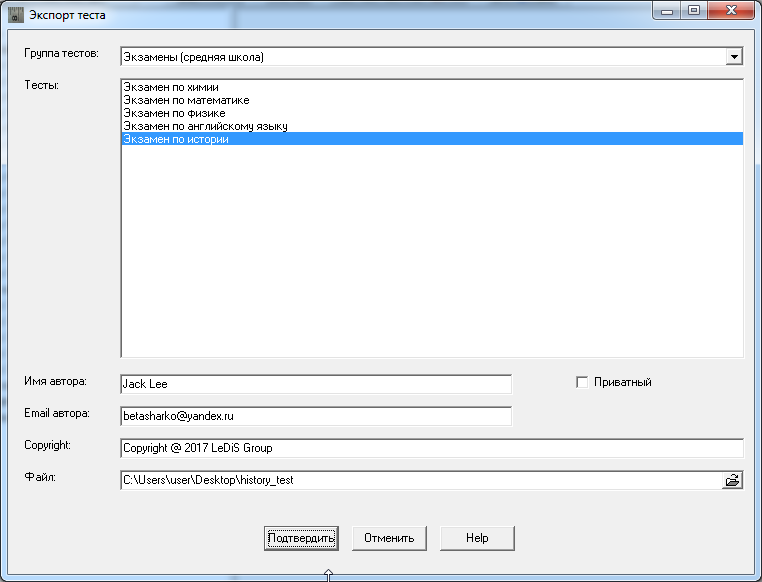
In this window:
- select the test group from which the test should be exported using the “Test group” list;
- select the test to export in the “Tests” list;
- activate the “Private” option if you want to prohibit anyone from editing the test after it is subsequently imported (use this option when developing original tests protected against copying);
- specify the test author’s name in the “Author name” field or use the default data for the selected test;
- specify the test author’s email in the “Author Email” field or use the default data for the selected test;
- specify the test author’s rights in the “Copyright” field or use the default data for the selected test;
- enter the name of the file containing the imported test in the “File” field.
Click “Confirm” to confirm exporting the data to the selected file or “Cancel” to cancel the operation and close the current dialog.
For convenient file selection, use the additional “Import Test” dialog by clicking the button
.
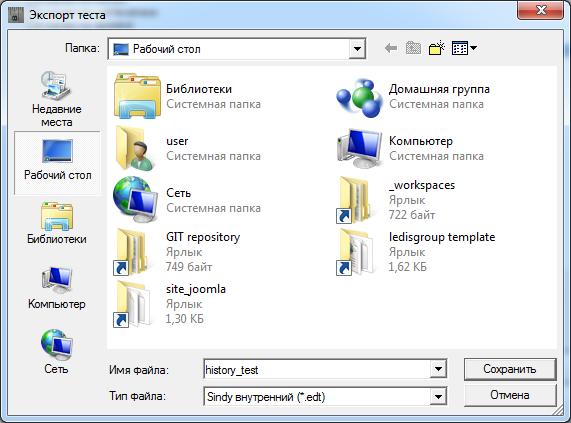
This window makes it possible to select the file in which information about the exported test will be saved. The following file types are available for saving a test:
EDT — a binary format from which the test can subsequently be imported into any Sindy project;
XML — a text format based on eXtensible Markup Language from which the test can be imported into any third-party program that supports this standard;
CSV — a text format from which the test can subsequently be imported into spreadsheet applications such as Microsoft Excel, OpenOffice Calc, etc.;
SWB — a binary format from which the test can subsequently be imported into the LeDiS Group website for online testing.
To select the test-import file, specify its name in the “File name” field. You can enter the full path to the file or use the “Folder” drop-down list and the “Recent Places”, “Desktop”, “Libraries”, “Computer”, or “Network” buttons to locate the file. The “Files of type” drop-down list can be used to enable or disable file filtering by file extension for Sindy projects.
Click “Save” to confirm selection of the file or “Cancel” to cancel the operation and close the current dialog.
6.12.3.Importing Scales and Interpretations from a Text File
When constructing a test, entering scales and their interpretations in the usual way can take too much time. For this purpose, Sindy includes a mechanism that allows a test to be populated with scales and interpretations more quickly.
First, prepare a text file in which each scale and interpretation appears on a separate line of text. The first line in each group is always a scale, and all following lines up to the nearest blank line are considered its interpretations. A group consisting of a scale and its interpretations can be separated from the next group by any number of blank lines, but at least one blank line must be present.
The classic Windows Notepad application can be used to prepare the file.
Now let us create an example containing a set of scales and interpretations in a text file and import them into a new Sindy project:
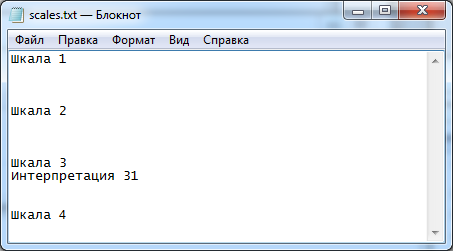
- Prepare a text file in “Notepad” with the following contents:
Scale 1
Scale 2
Scale 3
Interpretation 31
Scale 4
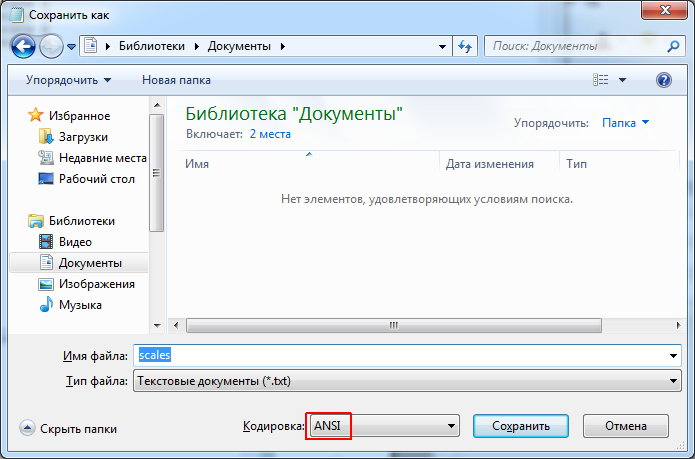
- Save the data to the “scales.txt” file. Select ANSI encoding.
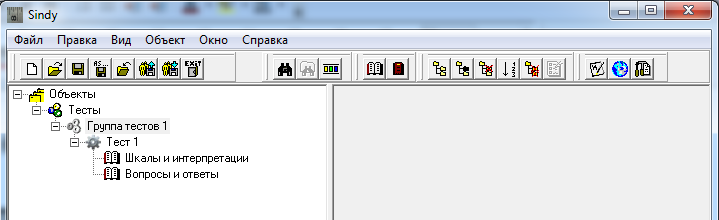
- Close this file and start Sindy. Create a new project, and within it create a new test group and test. Use the default names for the test group and test.
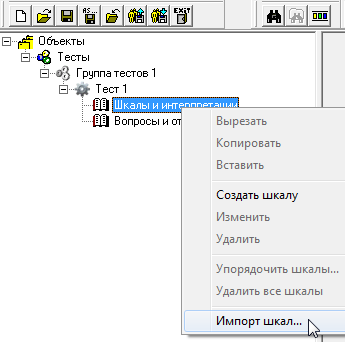
- On the “Scales and Interpretations” node, select the “Import scales...” context menu command.
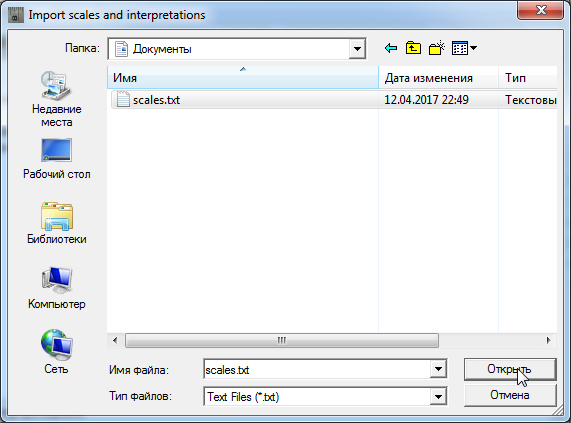
- In the “Import Scales and Interpretations” window, locate and select the file containing the list of scales created earlier. Click “Open” to confirm the file selection.
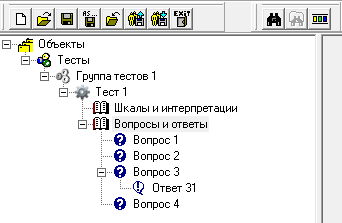
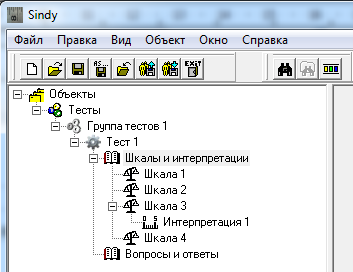
- In the Test Builder, expand the “Scales and Interpretations” node and verify that the list of scales and interpretations from the file we prepared has appeared.
6.12.4.Importing Questions and Answers from a Text File
When constructing a test, entering questions and their answers in the usual way can take too much time. For this purpose, Sindy includes a mechanism that allows a test to be populated with questions and answers more quickly.
First, prepare a text file in which each question and answer appears on a separate line of text. The first line in each group is always a question, and all following lines up to the nearest blank line are considered its answers. A group consisting of a question and its answers can be separated from the next group by any number of blank lines, but at least one blank line must be present.
The classic Windows Notepad application can be used to prepare the file.
Now let us create an example containing a set of questions and answers in a text file and import them into a new Sindy project:
- Prepare a text file in “Notepad” with the following contents:
Question 1
Question 2
Question 3
Answer 31
Question 4
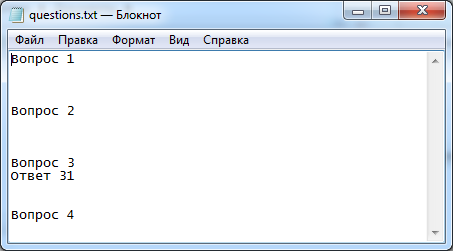
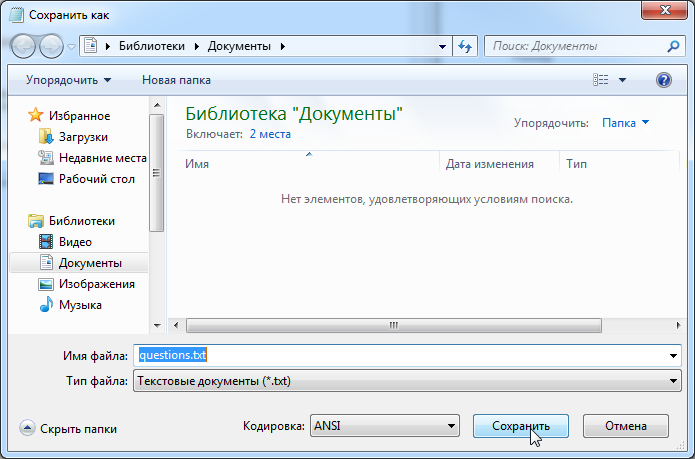
- Save the data to the “questions.txt” file. Select ANSI encoding.
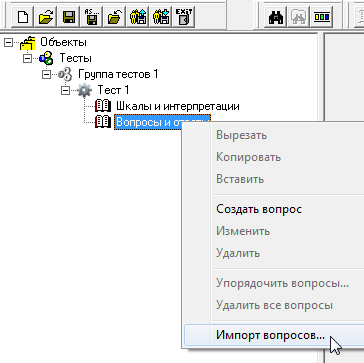
- Close this file and start Sindy. Create a new project, and within it create a new test group and test. Use the default names for the test group and test.
- On the “Questions and Answers” node, select the “Import questions...” context menu command.
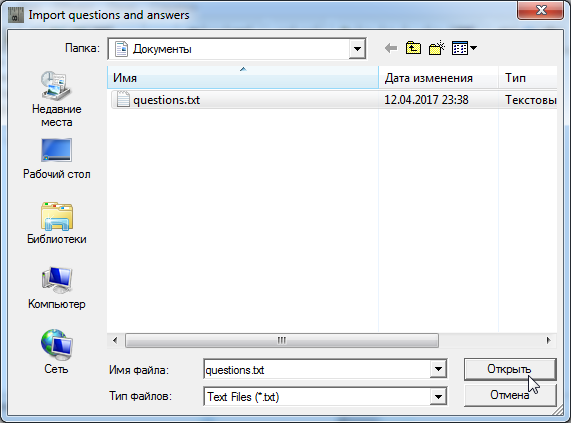
- In the “Import Questions and Answers” window, locate and select the file containing the list of questions created earlier. Click “Open” to confirm the file selection.
- In the Test Builder, expand the “Questions and Answers” node and verify that the list of questions and answers from the file we prepared has appeared.